
TrimUI Brick Hammer Laser Engraving
Sunday January 18th, 2026
The Idea
Last month I got a TrimUI Brick Hammer and I have been absolutely loving it. So far, I beat Donkey Kong 94 on it, and played a lot of Sim City for the SNES, as well as the NES prototype version. I thought, what a better way to commemorate these excellent first few games to play on my new doodad than to mod it.
I recently modded my Switch Lite with some spray paint, but my skills there are rough and a bit sketchy. The spray paint mod I did there was very easy and difficult to mess up, but I had a feeling it would be different here. As it turns out, the Ottawa Public Library has a space where you can use 3D printers, Cricut machines, sewing machines, and what caught my eye for this mod, laser engravers/cutters! All are free to use, and some of them (including the laser cutter), require being certified by the library, which is essentially just following a training video, an online quiz, and then a 1:1 session with a library tech to show you the ropes. Before I knew it, I was certified and ready to jump in the deep end.
Preparation
I started by getting my files ready at home. The machine prints by reading PDF files that are exports of SVG (which makes sense to me with it being a laser). I started looking for some sprite dumps from the games and decided on the end screen picture from Donkey Kong 94, as well as the moon from the "Goodbye" screen in Sim City (which has that melancholic tune that always entranced me). I wanted to modify the DK end picture a bit to remove the border, extend the edges, as well as the bottom. I even made Mario give his icon peace sign from Super Mario World. Here is the pixel art I ended up with:
![]()
Next was to just create the SVG files. I used Inkscape, as recommended by the library. It has useful tools for things with real-life measurements, so it was totally fine and usable for this project. I just had to measure the dimensions of my TrimUI Brick's pieces (for this, you need to take it apart so it lays flat) and created an SVG document based on those. I could then import my raster pixel art images into it and place them on my digital TrimUI Brick mockup. Exported as PDF and loaded my files on a USB stick.
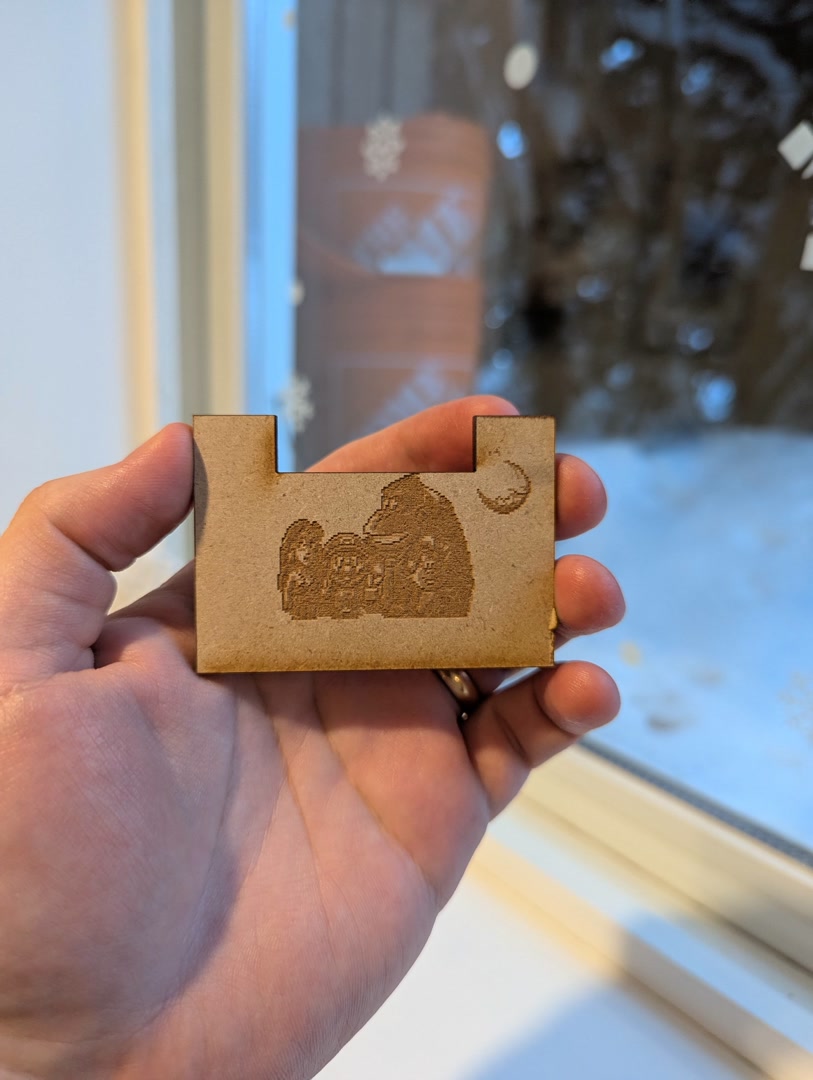
Laser Session #1
I showed up yesterday to the library, without an appointment, and thankfully there was a spot free. I started by using some scrap pieces of 1/8" MDF that someone had left over from another project. I used my TrimUI Brick mockup design to cut the MDF to match the physical dimensions of my Brick, as well as the big black cutout it has at the top for the wifi/bluetooth antenna. I could then engrave the images to the MDF, and here is what I got:
Video on YouTube: https://youtube.com/shorts/yRDShqpmx6Y?feature=share
Looking pretty much as I expected on MDF! Next was to print it on my Brick. Thankfully, I had the idea of printing it on the inside of the backplate before doing the actual print on the back of the Brick, as that would be irreversible. Here was the result:
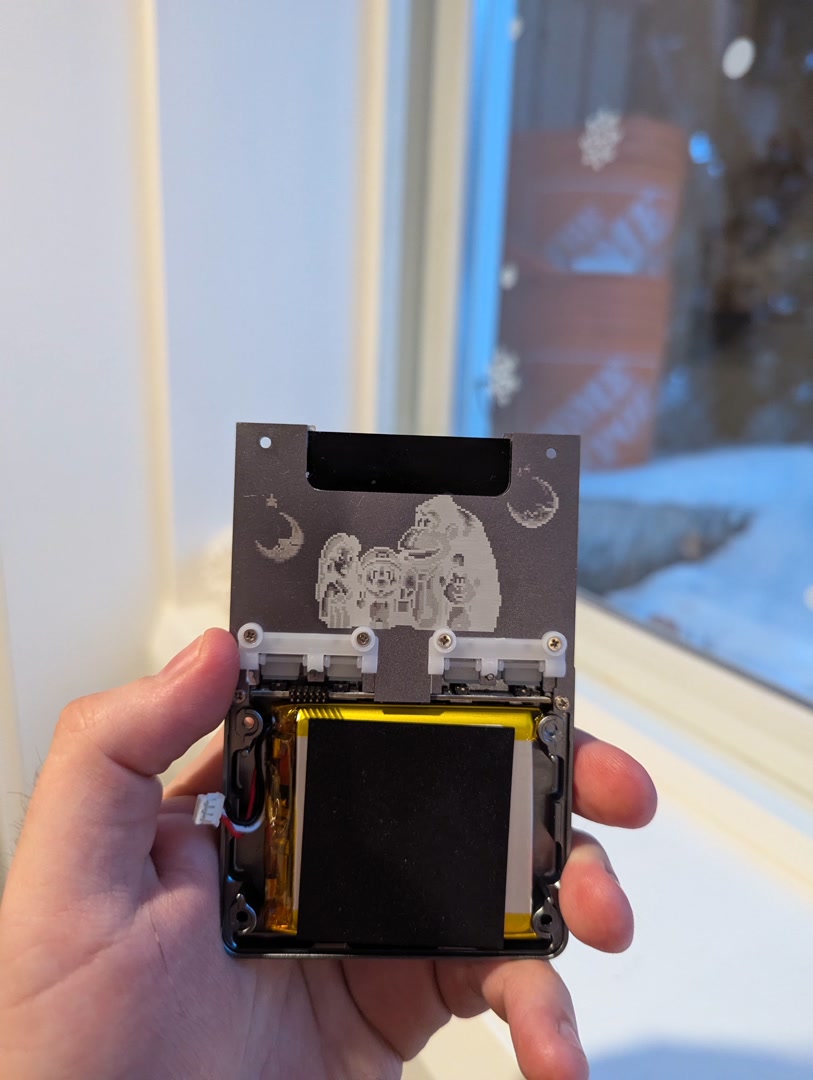
That looks creepy :O
I was so glad that I tested this on the back first. I wasn't sure how the printing on the anodized aluminum would work, would it keep lighter parts of the image lighter by removing the coating? I should have known the machine wasn't that smart. And how could it be, it doesn't know what material I'm printing on... At least the resolution looked good, so there was hope of completing the project successfully.
Since the coating on the TrimUI Brick Hammer is darker than the color of aluminum, when your image has darker parts, it will engrave more surface off the picture, making it more white. Thankfully, the solution was easy. I simply had to load my pixel art image in Gimp and invert the colors. Now, my image looked creepy, but the print should be fine.
![]()
Something I noticed as well from my initial first fail engraving, is that any places where the image is pure white, the laser won't engrave. So if I wanted to have it print areas that were set as pure black, which, when inverted, became pure white, I needed to make the pixels initially a very dark gray before inverting them, so that they wouldn't be pure white in the print and the laser would actually engrave those areas.
Unfortunately, the library was closing and I didn't have time to debug and fix the issue. I'll need to come back.
Laser Session #2
Today I booked the laser machine and was determined to fix this up. I still wanted to do some testing, so I once again printed on some MDF first and it looked good! I had also prepared a separate print document that would just print the moon again, but with its colors inverted, to the left of the DK image (you can see it in the last picture above). I tried printing this and I could see a noticeable difference between the first moon and the last one. I now had confidence. I ran the print on the actual back part of the TrimUI Brick and crossed my fingers.
Video of the print: https://youtube.com/shorts/-8y8Nu70GVU?feature=share
It looks sooo gooood! The only mistake I made was I moved the picture down too much. In my first MDF print yesterday, it was too high, but I overcompensated. Unfortunately the machine has a small gap on the top and left side that makes it not perfectly aligned with your measurements, so I had to guess a little and I was off. I'm just going to say I did it on purpose to leave room for more prints in the future ;)
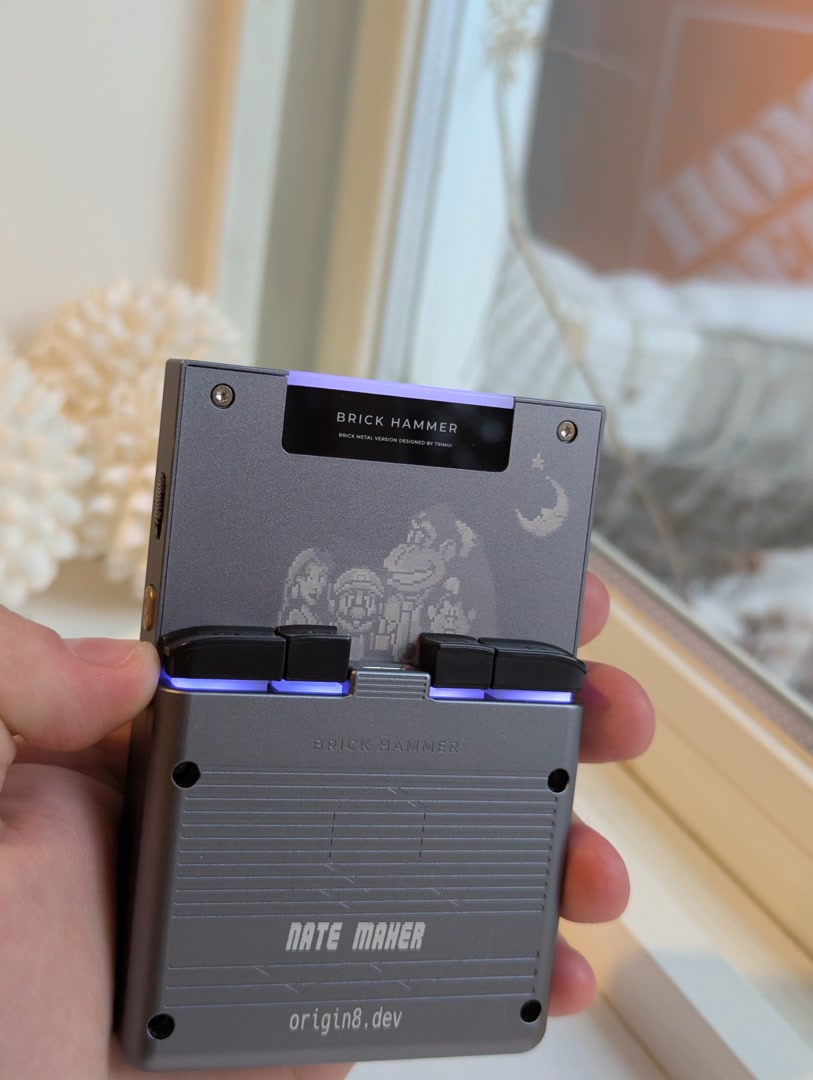
While it was disassembled for the last few days, I also took the opportunity to spray paint the power and function switch gold (to symbolize when it is on). I felt it was more on-brand to my Switch Lite mod than the turquoise button it comes with. Thankfully, the power LED charging indicator light is still easily visible even with the spray paint applied.
That's it for this mod! I hope you enjoyed reading about my journey and maybe got inspired to perform your own similar mod. I want to thank the Ottawa Public Libary for providing these spaces for public and free use, as well as Anthony for the 1:1 training. It was so cool seeing people there all weekend working on all sorts of projects. It's such a great resource for the community that promotes creativity, and I'll be sure to keep going. Go to you public libraries people!
Cheers,
Nate